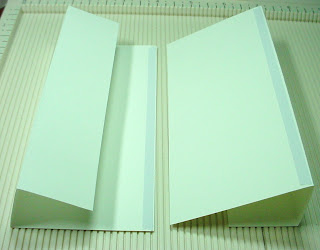
Then one half you score one more time like you do your regular Easel card. This what you should have
Now we heed two of 5.5 " x 5.5 " squares. And you do the same, as first card. Fold on half, and one half, one more time on half
Now you must have two mini Easel cards
For me easy to glue this mini cards together if i add glue strip on the bottom of one card and i flip over other one up side down and put glue strip on the top part as you can see on this photo
Then you line up two card inside like so
And make sure your lines with the glue goes perfectly together
After you did that, you will have this
Now flip over this cards and put glue strips on the top and the bottom
Now we need to add this mine Easels to our First big Easel card. I start to glue them from the bottom , that way it will be all lined up, after your folds folded down.
Here is your card all ready to be decorated
After your folds down, your card should looks like this
And here is my finished card
Will like to know, what you think about this tutorial. I really hope you can use it.Hugs Nataliya


17 comments:
fabulous toot and gorgeous creation so very pretty
Hugs Kate xx
These are great instructions and I am looking forward to trying one of these beautiful cards. TFS
Hi Nataliya, Fabulous tutorial will be giving this a try,thanks for sharing!! I am so happy to be on your team thank you x x Hugs May x x x x
Oh wow, what a stunning tutorial, thanks for taking the time to do this for us. I have saved it under my favourites to give it go. Your tripe easel creation is really a stunning fairytale of beauty.
Hugs
Desire
thanks for tut very lovely
Oh Natalya!
So lovely! Thank you so much for your tutorial, I am going to make one!
Hugs & Kisses!
Chriss
Thank you for the tutorial Nataliya, what a stunning creation and what a fantastic card , great colours and I love the fairy's. Well done Great work hugs Elaine
Hi Nataliya, Lovely card and lovely shape! Thanks for the Tutorial too. Also i wanted to say thankyou to you for stopping by my blog and leaving such a lovely, much appreciated comment. Judy x
This is gorgeous! I haven't made one of these cards before but you have inspired me! :D
Hugs,
Beth
Gorgeous creation Nat, love all your sweet images and beautiful colors--fantastic tutorial as well
Deb
xxx
You are a lovely person sharing your tutorials, thanks and also thanks for your sweet comment on my creation 'ur so' at Whoopsy Daisy. Such gorgeous images I must admit and lucky to win them...hopefully more on the way.
Have joined as a new follower of your lovely blog..luv Aussie Annie
Natalia this is beautiful with three fabulous images well done Hugs Elaine
Natalia, please add me to the list of the best blogs in this blog!
http://lovecraftsforever.blogspot.com/
Natalia,
Thank you so much for that tutorial, fabulous fold card! Your card is so truly stunning, breath taking! I love all the layers and depth with this design! Your clolouring is terrific! IMHO I think you should put that into your Etsy shop.
Great job!
Peace,
KristyLee
A wonderful and clear tutorial Nataliya and I really adore your fairy card, it's beautiful! Thanks for your sweet comment on my blog, have a lovely weekend, hugs, Ira x
irascreacorner.blogspot.nl
Stunning triple easel card, thanks for the inspiration!
Hugs, Elenor
Super tutorial. Thank-you Nataliya! Nicola x
Post a Comment